
Game 7 of Hero for a Day saw my White Scars taking on Nick's Tau. Tau are always a tough match up for my White Scars. All the high strength firepower with access to Ignores Cover is tricky for Space Marine Bikes. It didn't help that they would be ably commanded by Nick (check out The Burning Eye for Nick's army and battle reports).

The mission was Cleanse and Control. This is the maelstrom mission where you draw up to 3 cards each turn. The mission was also using Vanguard Strike. Thanks to the mission special rules for Hero for a Day, the Attacker (Nick) got first turn automatically and I could not seize the initiative. There were one or two gentle ribbings about the fact Nick's team got the automatic first turn in the game. I was not concerned, going second with Bikers against a Tau gunline, what could possibly go wrong?
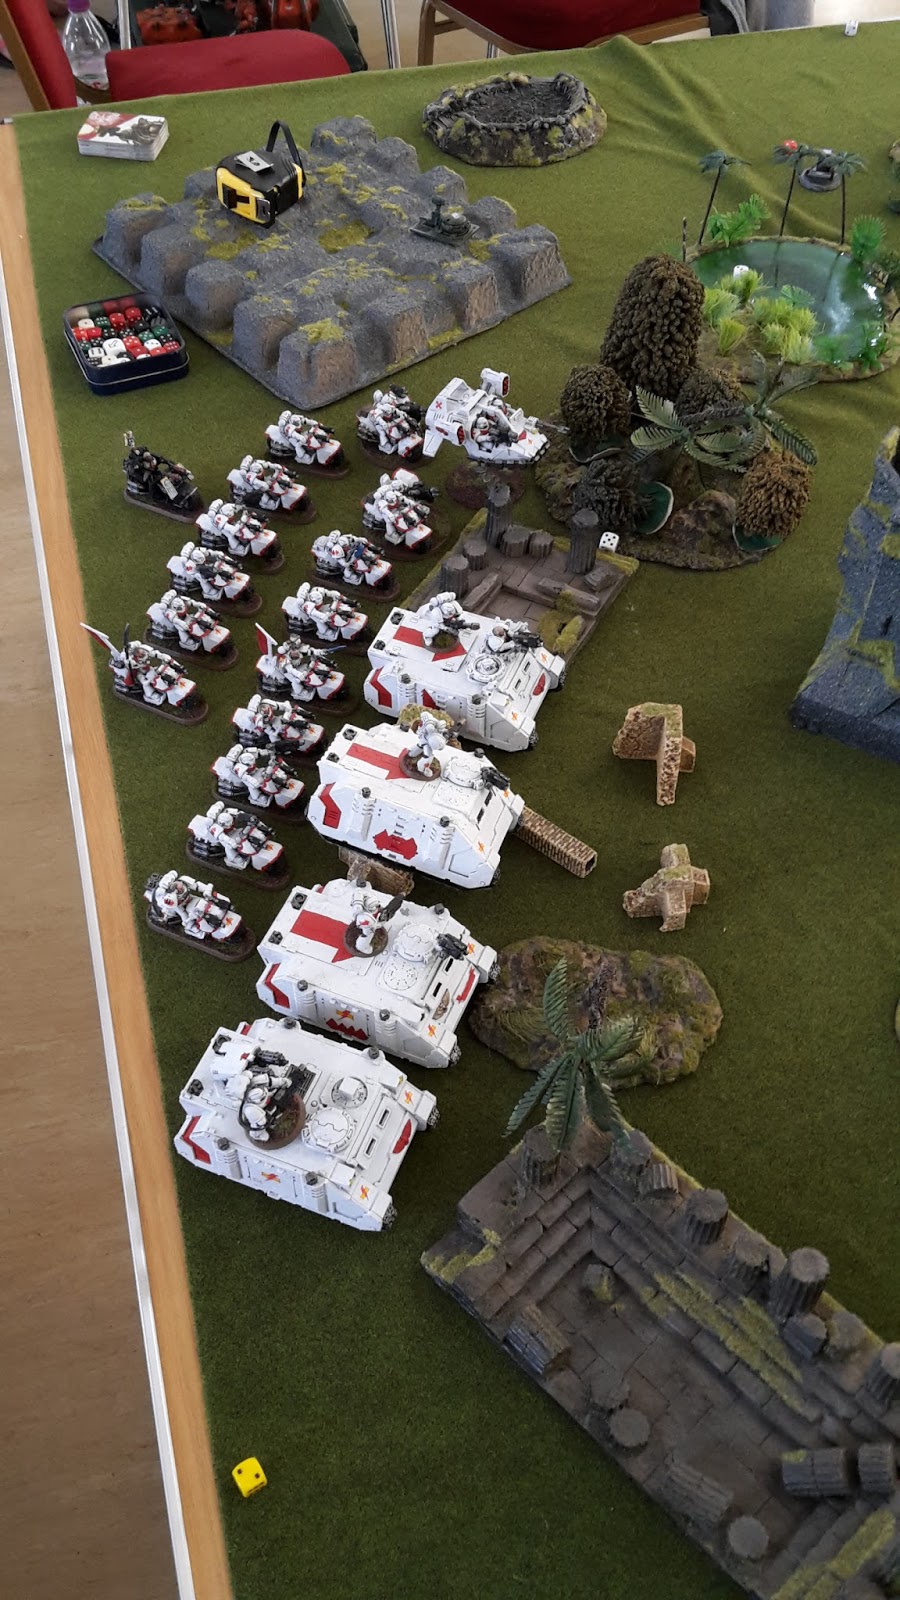
As a reminder, my army consisted of:
Scarblade Strike Force
Stormlance Battle Demi-Company
Khan- Moondrakkan (with BS1)
5 Tactical Marines- Bolters, Flamer, Meltabombs (T1)
Rhino (R1)
5 Tactical Marines- Bolters, Grav gun, Meltabombs (T2)
Rhino (R2)
5 Tactical Marines- Bolters, Meltagun, Meltabombs (T3)
Rhino (R3)
5 Devastators- 4 Grav Cannons, Combi-grav (D)
Razorback- TL Assault Cannon (Rz)
Attack Bike- Multi-melta (AB1)
Hunting Force
Chaplain- Bike, The Hunter's Eye, Meltabombs (with BS2)
6 Bikers- 2 Grav guns, Power Axe, Meltabombs (BS1)
6 Bikers- 2 Grav Guns, Meltabombs (BS2)
6 Scout Bikers- Meltabombs, 2 Grenade Launchers (SB)
Attack Bike- Multi-melta (AB2)
Stormbringer Squadron
Landspeeder- Multi-melta, Typhoon Missile Launcher (L)
5 Scouts- Meltabombs, Combat weapons, Bolt pistols (S1)
Landspeeder Storm (LS1)
5 Scouts- Meltabombs, Bolters (S2)
Landspeeder Storm (LS2)
My warlord was Khan, giving me Scout for my army. This would be great for closing with the Tau as quickly as possible.
Nick's army consisted of:
Hunter Contingent
Hunter Cadre
Commander- Drone Controller, 2 Shield Drones, 2 Missile Pods, Multi-tracker, Neuroweb System Jammer, Onager Gauntlet, Engram Neurochip, Shield Generator, Battlesuit (TC)
Riptide- Early Warning Override, Ion Accelerator, Shield Generator, TL Fusion Blaster (R)
3 Crisis Battlesuits- Fusion Blaster, Plasma Rifle, Target Lock (CS)
4 Marker Drones (MD)
Piranha- 2 Gun Drones, Fusion Blaster, 2 Seeker Missiles (P1)
Piranha- 2 Gun Drones, Fusion Blaster, 2 Seeker Missiles (P2)
Hammerhead Gunship- Ion Cannon, TL Smart Missile System (H)
10 Fire Warriors (Breacher Team)- Pulse Blasters (FW1)
Devilfish- Burst Cannon, Disruption Pod, TL Smart Missile System (D1)
11 Fire Warriors (Strike Team)- Pulse Carbines (FW2)
Devilfish- Burst Cannon, Disruption Pod, TL Smart Missile System (D2)
5 Fire Warriors (Strike Team)- Pulse Rifles, DS8 Tactical Support Turret (FW3)
Optimised Stealth Cadre
Ghostkeel (G)
3 Stealth Suits (SS1)
3 Stealth Suits (SS2)
His warlord trait was Exemplar of the Selfless Cause that allow him to ignore the effects of going to ground. Not the worst Tau army I had come across, but it wasn't going to be a walk over either.
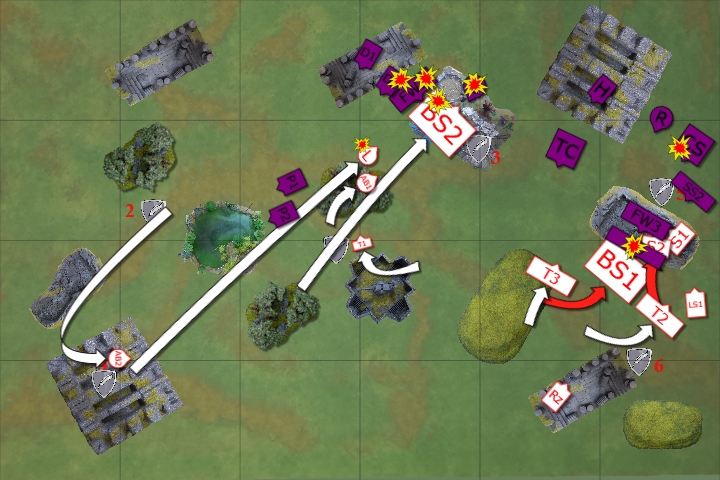
We deployed the objectives as shown below:

Nick was first to deploy. He put both Devilfish on the right flank, with the Ghostkeel and Commander besides them. The Hammerhead deployed at the back on the rock outcrop. The Piranhas went behind the Devilfish. On the left flank, the 5-man Strike Team went in the trenches, with the Crisis suits behind them. The Riptide went towards the centre. The Stealth Teams were held back for infiltrating.
I then deployed in a refused flank formation on my right flank. I put the Rhinos and Razorback up front on the right. I then put the two biker units behind the transport. The Landspeeder and Attack Bikes went towards the centre, ready to go for the far away objectives. I kept the Scouts and Landspeeder Storms for infiltrating.
I won the roll off for placing infiltrators. This was crucial as Nick could have cut down my Scout moves with his Stealth Suits. I placed the Scout Bikers in front of my line as far forward as possible. This would allow me to move up my army to maximum effect. Nick then placed a Stealth Team towards the centre. I placed both my Landspeeder Storms on the right flank and a second unit of Stealth Suits went opposite them.
With the infiltrators placed, I scouted my army forward. My plan was to rush the Tau lines with a massed force on one flank. Hopefully, I could weather the storm of the first turn of fire and overwhelm one flank, before rolling up the other, grabbing objectives where I could.


For my Hunting Force, the targets I chose were:
Primary- Tau Commander
Secondary- Riptide
Tertiary- Ghostkeel
I could not seize and Nick took the first turn.
TURN 1- TAU
In turn 1, Nick drew Objective 1, Objective 6 and Feigned Withdrawal (destroy an enemy unit within 9" of a Tau unit that was not in your deployment zone).

The Riptide moved towards the left flank, joined by the Marker Drones and Piranhas. The Devilfish advanced slightly to bring their guns to bear. The Stealth Suits advanced on the White Scars units.


The two Devilfish opened fire on the closest Attack Bike. Despite wounding it four times, they failed to get past the armour of the bike. One of the Stealth Teams opened fire on a Rhino. They glanced the vehicle once and penetrated it, immobilising the vehicle with their Burst Cannon. The other members of the squad fired at the transport, wrecking it (thanks to striking the Rear armour with the formation benefits).

The Ghostkeel fired at a second vehicle, wrecking it as well. The second Stealth Team fired at the Landspeeder Storm, wrecking the Jinking vehicle with a glancing and penetrating hit.
The Crisis Suits fired at the second Landspeeder Storm, but failed to harm the jinking skimmer.

The Tau Commander fired at the third Rhino, penetrating it and shaking it. The Piranha fired its missiles at the Rhino, but failed to cause any damage. The Hammerhead fired its Ion Cannon at the Rhino. The mighty shot penetrated the Rhino, but the cover saved the shot. Two Tactical Marines were slain in the blast as well. The Smart Missiles from the Hammerhead succeeded in destroying the transport vehicle.
The Fire Warriors opened fire at the Scout Bikers, but failed to harm the jinking bikers. The Riptide fired at the Tactical Marines, killing four of the squad and pinning them.

The Tau battlesuits then used their assault move to retreat from the White Scars lines.

At the end of his turn, Nick scored objective 1 and First Strike. He discarded Objective 6. The Tau had hit hard, destroying my three Rhinos, but it could have been much worse.
TURN 1- WHITE SCARS
In my first turn, I drew Hungry for Glory (issue a challenge), Psychological Warfare (force a failed morale test) and Supremacy (hold at least two objectives and twice as many as your opponent).

After the hail of Tau firepower, the White Scars advanced on the gunline. The Chaplain led his bike squad around the Bastion towards the Stealth team, while Khan led the right flank forward towards the forces before them. The Razorback managed to throw a track while traversing the ruins, immobilising itself on the rocks (after I failed my dangerous terrain test). The Devastators emerged from the transport, running forward to get into cover. Only the Landspeeder and an attack bike moved away from the enemy to secure the objectives.


The Chaplain's Bike squad fired at the Stealth Team in front of them, eliminating them thanks to the Hunter's Eye and their grav guns. An attack bike fired on the Ghostkeel, but failed to get past its impressive cover save. The second attack bike fired at a Piranha, managing to glance the skimmer, but the jinking pilot blocked the damage.

The Landspeeder fired at a Devilfish, but caused no harm despite hitting twice with its krak missiles.
On the right flank, the Scout Bikers snap fired at the Fire Warriors, killing one of the squad. The Landspeeder Storm added its firepower, killing another of the squad.

The Razorback fired its Assault cannon at the Riptide, wounding it once, but the armour of the mighty battlesuit saved it. Khan directed his bike unit to fire at the Riptide, hitting it twice with their grav guns, but failing to wound!
At the end of my turn, I scored Supremacy for 3 points and First Strike. I discarded Psychological Warfare.
VICTORY POINTS:
Tau- 2
White Scars- 4
Tau- 2
White Scars- 4
At the end of turn 1, I was ahead, but had suffered heavy losses to my transports. My return fire on the Tau had not been too successful, only taking out one unit of Stealth Suits. I was hoping to have more success in combat in the following turns.
TURN 2- TAU
In turn 2, Nick drew Objective 2 and Domination (hold all 6 objectives) to go with Feigned Withdrawal.

The Piranhas advanced on the Attack Bikes, while the rest of the Tau units moved up to engage the White Scars on the left flank.


The Piranhas fired on an Attack Bike, but failed to harm the jinking biker. The two Devilfish opened fire on the second Attack Bike, wounding it once.
On the other flank, the Stealth Suits opened fire on the Landspeeder Storm, but failed to cause any harm on the jinking skimmer. The Crisis Suits opened fire on the Devastators, obliterating the White Scars unit in a hail of fire.
The Strike Squad opened fire on the Scout Bikers, the Tactical Support Turret killing one of the squad. The Markerlight Drones attempted to target Khan's unit, but failed to hit them. The Tau Commander opened fire on the Bikers, wounding them three times, but all the wounds were saved.
The Hammerhead fired on the Scout Bikers, killing one of the Jinking Bikers. The Riptide targeted the Bikers, killing one of the squad. The Gun Drones fired at the Bolter Scouts, killing two of the squad. The Ghostkeel opened fire at the Scout Bikers, wiping out the unit.
At the end of his turn, Nick scored Feigned Withdrawal and discarded Domination.
TURN 2- WHITE SCARS
This turn, I drew Domination (hold all 6 objectives) and Objective 4 to go with Hungry for Glory.
On the right flank, the Bikers continued to advance on the Tau lines, the Scouts disembarking from the Landspeeder Storm. The Chaplain led his Bike Squad into the forest in front of the Ghostkeel. One of the Attack Bikes moved to claim objective 4, while the Landspeeder advanced.


The Attack Bike fired at the Hammerhead, but failed to cause any harm. The Chaplain's unit opened fire at the Ghostkeel, killing the enemy Battlesuit. The Landspeeder fired it Multi-melta at the Devilfish, penetrating the vehicle and exploding it. The Breacher Team took seven wounds, but only one fell to the explosion (Nick randomised the wound stating that on a 12 the sergeant died. He then promptly rolled a double 6!). The explosion managed to glance the Landspeeder and kill one of the Bikers. The Attack Bike fired at the Piranhas, but failed to hit.

On the right flank, the Razorback fired at the Crisis Suits, killing one of the squad with its Assault Cannon. The Crisis Team failed their morale test and fell back 9". Khan's Bike squad fired at the Drones, but failed to cause any wounds. The Tactical Squad fired at the Drones, killing one.
The two squads of Scouts assaulted the Fire Warriors. The overwatch fire from the unit killed one of the squad. The Scouts wiped out the Strike Squad in combat for no loss, the Sergeant issuing a challenge in the process.

Khan's Bike squad assaulted the Drone unit, wiping them out with their hammer of wrath attacks.


At the end of my turn, I scored Hungry for Glory and Objective 4. I discarded Domination.
VICTORY POINTS:
Tau- 3
White Scars- 6
At the end of turn 2, I had widened my lead on Nick's score. I had managed to take out a couple of the Tau units in combat, as well as taking out a few squads in the shooting phase. Nick had also taken out a couple of my own units.
TURN 3- TAU
In turn 3, Nick drew Objective 5 and Objective 6 to go with Objective 2 from last turn.

The Crisis Suits rallied, moving up to re-engage the White Scars. The Stealth Suits moved up on the Razorback. The Strike Squad disembarked from the Devilfish, moving to join the Breacher Squad to target the Chaplain's squad. The Piranhas continued their advance towards the White Scars lines. The Riptide moved up to engage, failing its Nova Charge and taking a wound.


The Markerlight squad fired at the Chaplain's unit. The Gun drones fired on Khan's unit, but failed to cause any wounds.
The Breacher Squad opened fire at the Bike unit in front of them, using the Markerlights to ignore their cover and increase their ballistic skill. The shots wiped out the Bike squad and wounded the Chaplain once. The Devilfish fired at the Chaplain, killing him.
The Strike Squad fired at the Landspeeder, penetrating the skimmer twice and destroying it.
The Piranhas opened fire on the Attack Bike, but failed to harm the Jinking biker. The second Piranha killed one of the bikers from Khan's unit.
The Riptide fired its overcharged Ion Cannon at Khan's bike squad, but the shot scattered off, killing three of the marines and one markerlight drone. The Hammerhead attempted to fire at Khan's unit, but the cannon got hot and misfired. The Crisis Suits fired at Khan's Bike squad, but failed to cause any damage with their snap shots.
At the end of his turn, Nick scored no points.
TURN 3- WHITE SCARS
This turn, I drew Objective 3, Objective 6 and Big Game Hunter (destroy an enemy vehicle).

The Attack Bike advanced towards the right flank. The Bike squad advanced on the Crisis Suits, while the Scout Squad moved back to engage the Stealth Suits. The second Scout squad moved towards the nearby forest. The other Attack Bike moved up on the Hammerhead.


The Attack Bike fired on the Hammerhead, glancing the vehicle once. The Bikers fired on the Crisis Suits, wounding them twice with their grav guns. The Razorback fired on the Markerlight Drones, killing the unit. The two units of Scouts ran towards the objectives.

The Bike Squad assaulted the Crisis Suits, suffering a wound in overwatch. The two hammer of wrath wounds were saved, but Khan cut down the last suit in combat.

The Attack Bike assaulted the Hammerhead, but failed to hit with his grenades.
At the end of my turn, I scored Objective 3 and Objective 6.
VICTORY POINTS:
Tau- 3
White Scars- 8
TURN 4- TAU
This turn, Nick had Objective 2, Objective 5 and Objective 6.

The Piranhas moved round the woods in front of them. The Riptide moved up on the Attack Bike, the Stealth Suits moved to the side of the Razorback.


The Tau Commander fired his missiles at the Tactical Marines, killing one of the squad. The Piranhas opened fire on the lone Tactical Marine besides the Bastion, killing him. The Devilfish opened fire on the lone Scout, easily slaying the last member of the squad.

The Stealth Suits fired at the side of the Razorback, glancing it once after the Burst Cannons failed to hit. The Riptide fired at the White Scars holding objective 6. The mighty Ion Accelerator hit square on target, killing 5 of the Marines and four of the Scouts, leaving only one Scout remaining.

At the end of his turn, Nick scored Objective 2.
TURN 4- WHITE SCARS
This turn, I drew Assassinate (kill an enemy character), Hold the Line (have units in my deployment zone and no enemy units) and Big Game Hunter (destroy an enemy vehicle). With very little of my army left on the board, I decided to score as many points as I could and try and stay alive until the end of the game.

The Attack Bike, lone Scout and Landspeeder Storm advanced on the Stealth Suits, hoping to rid the enemy presence from their lines. The other Attack Bike and Khan's Bike squad moved to the rear of the Hammerhead to target the vulnerable armour there.


In the shooting phase, the Landspeeder Storm fired at the Stealth Suits, killing one of the squad. The Attack Bike and Scout fired at the remaining Stealth Suits, the Multi-melta killing one more of the squad. The Razorback fired at the Tau units, only hitting twice with its four twin-linked shots. I then rolled a double 1 to wound, failing to cause any damage.
The other Attack Bike fired its Multi-melta at the Hammerhead, penetrating the vehicle, but the cover of the rocks saved it from harm.
In the assault phase, the Attack Bike and Scout assaulted the last of the Stealth Suits. Their hammer of wrath attacks failed to cause any damage, but the combined attacks of the White Scars destroyed the unit.

The Attack Bike and Khan's unit assaulted the Hammerhead, their combined hammer of wrath attacks proving sufficient to wreck the enemy vehicle.

At the end of my turn, I scored all three of my objectives.
VICTORY POINTS:
Tau- 4
White Scars- 11
Tau- 4
White Scars- 11
At the of turn 4, I was well ahead on maelstrom points. However, I only had 9 models left on the board and there was a lot of Tau firepower left over for me to try and survive up to 3 more turns.
TURN 5- TAU
This turn, Nick drew Objective 1 to go with Objectives 5 and 6 from last turn.

The Strike Squad moved up on the objective besides the Bastion, while the Tau Commander moved to secure a second objective.


Khan's unit was lit up with two markerlights. The Riptide opened fire on the unit, killing three of the Bikers, wounding Khan and wounding the Attack Bike. The Devilfish opened fire on Khan, wounding him twice, but only one managed to get through his armour, leaving him on one wound.
The Tau Commander used him jetpack move to secure the nearby objective.
At the end of his turn, Nick scored Objective 1 and Objective 5 for two points.
TURN 5- WHITE SCARS
This turn, I drew Objective 5, Objective 5 and Objective 4.

Khan led the Attack Bike up towards objective 5, the Landspeeder Storm moving to give supporting fire.

Khan and the Attack Bike opened fire on the Tau Commander, killing two of the drones and pushing them off the objective. The Landspeeder Storm fired at the Commander, wounding the Commander twice with its weapons. The Razorback opened fire on the unit, but its three wounds were all saved. Finally, the second Attack Bike fired on the Commander, wounding him once, but a Shield Drone saved him from instant death.
I chose not to charge the Commander with Khan and the Attack Bike. They were both on one wound and I figured that the supporting fire overwatch may have been able to kill them.
At the end of my turn, I scored Objective 5 twice and discarded Objective 4.
VICTORY POINTS:
Tau- 6
White Scars- 13
I was still ahead on points, but down to precious few models. We rolled to see if the game would continue and it did.
TURN 6- TAU
This turn, Nick had Objective 3, Objective 4 and Objective 6.

The Breacher Team disembarked from the Devilfish to secure the Objective, while the Tau Commander moved to secure objective 6. The Piranhas moved across the White Scars lines to grab their objective.

The Devilfish fired at the Attack Bike, taking its last wound. The Breachers fired at the White Scars warlord, hitting him 14 times and wounding him 8 times with their pulse weapons. In some great rolling, I managed to save all eight wounds, Nick couldn't believe it! The joy was short lived as the Tau Commander turned his attention on Khan and obliterated him from the battlefield.
The Riptide fired on the Razorback, but the shot scattered off target and caused no damage.
At the end of his turn, Nick scored all three objectives as well as Slay the Warlord to narrow my lead.
TURN 6- WHITE SCARS
This turn, I drew Objective 1, Objective 3 and Objective 6. Of these three, only objective 6 was feasible to achieve.

The lone Scout moved up on the objective, while the Attack Bike moved back and the Landspeeder Storm moved up on the Tau lines.

The Razorback opened fire on the Tau Commander, but all three wounds were saved. The Attack Bike fired on the Commander, the Multi-melta wounding. The Commander failed his Look Out Sir roll, but managed to pass his invulnerable save.
At the end of my turn, I scored Objective 6 and discarded Objective 1.
VICTORY POINTS:
Tau- 9
White Scars- 14
This were getting very close. We rolled to see if the game would continue and it did. Unless Nick had an amazing round of scoring, I would just need to hold out and stay alive for the win.
TURN 7- TAU
This turn, Nick drew Big Game Hunter (kill an enemy vehicle), Objective 4 and Objective 6. My lone objective secured Scout was currently holding objective 6, so would need to be dealt with.
This turn, Nick drew Big Game Hunter (kill an enemy vehicle), Objective 4 and Objective 6. My lone objective secured Scout was currently holding objective 6, so would need to be dealt with.

The Tau Commander advanced on the lone Scout, while the Breacher Team and Devilfish moved up to support.

The Tau Commander fired at the lone Scout, wounding him twice. I decided to go to ground in the open just to see what would happen. Imagine my surprise when I rolled a double 6 and the Scout survived the attack!

The Devilfish opened fire on the Razorback, wrecking the vehicle with its missiles.
The Tau Commander charged the Scout. He wounded the White Scar warrior, but I made my save. The Scout struck back wounding the Commander, but this too was saved. Against the odds, the Scout had survived to deny Nick the objective.

At the end of his turn, Nick scored Big Game Hunter and Objective 4.
TURN 7- WHITE SCARS
In my final turn, I drew Objective 2, Objective 3 and Blood and Guts (kill a unit in the assault phase).

The Landspeeder Storm moved to secure objective 3, while the Attack Bike moved stayed in position.


In the assault phase, the Scout and Commander struck at one another, but to no avail.
At the end of my turn, I scored Objective 3.
VICTORY POINTS:
Tau- 11
White Scars- 15
White Scars- 15
 |
| End of the game. |
The White Scars had come away with the win!
AFTER-BATTLE THOUGHTS
Mike:
Thanks to Nick for an awesome game of 40k. It was great to finally get a game with him after all this time chatting on one anothers' blogs online. It was a very strong Tau army, but not an overly filthy one.
Going second against Tau is never fun with a Biker army. Nick concentrated his firepower on my transports at the start of the game, taking all three Rhinos out before I could do much. Fortunately for him, my Razorback decided to help him out by immobilising itself on the first turn on some rocks.
I had set up so that the vehicles shielded most of my Bikers, as I feel that these were the bigger threat and what Nick would have targeted had he had the chance.
Overall, I think my plan worked well. By focusing on one flank, I cut down the number of Tau guns that could easily target me and it allowed me to try and destroy one flank. Even though I cut down the number of guns, the Tau gunline was still brutal, leaving me with only 3 models left on the table and much of the Tau army still alive. I also got lucky with the maelstrom cards and was able to sacrifice small units to get the points during the game.
The man of the match for me was the lone Scout from the combat squad. Going to ground in the open and getting a double 6 save meant he survived the Commander's firepower to claim the objective. I think Nick was in disbelief for a while after that roll! He was also able to save a good number of wounds in combat to survive the game till the end.
It was a great game, surprising so as both Nick and I had been up for about 39 hours at that stage.
Nick:
I have to say, this was my favourite of all my games at hero for a day - I won both my kill team games but this goes to show that winning isn't everything in the fun stakes!
Both Mike and I had taken comparatively friendly lists, not wanting to max out on the cheese in our armies, which is perfectly possible for both factions. The game started really well for me, and I almost felt sorry for Mike as I set about limiting his mobility. Taking down the transports was my number one priority, as he'd not brought all that many bikes in comparison to some of his lists, so to see them all go down on turn 1 was great, especially when his razorback then crippled itself on a particularly gnarly tuft of grass.
That was the high point though, as my card draws for my objectives really hurt me I felt. Mike is a really good player and made the most of everything he'd got on the table, whilst in comparison I always felt like I'd not got quite enough firepower. It's a recurring theme with my Tau, I often take out most of my target, leaving just a couple of models but fail to completely wipe them out, and in this game, that really hurt, in particular that fudging scout who passed both his go to ground saves! That one really messed up my firing plans for the turn!
Overall I think two things really cost me this game, and that's that Mike never let up the pressure on me, forcing me to spread my firepower too thin instead of holding off one flank whilst I dealt with the other, and the second point was the difficulty of scoring my cards. Now part of that was my own fault as I didn't take any obsec units, but usually the extra firepower the Hunter Cadre grants allows me to get away with that. Not this time sadly, and whilst I felt that it was feasible I could have wiped his force off the table until the last turn, it never quite turned out that way.
I'm looking forward to locking horns again in the future, possibly with my Dusk Knights next time!
Really cool batrep! Close up until the last turn, that's how I like them! Well played on both sides it seems. Did you get any mileage out of your special core formation rules though? I would've thought you'd get rid of the commander asap what with your Hunting Force bonus. Also, why did you run your Devastators in turn 1 instead of shooting and getting back into the Razorback? And why did you shoot your Hunters Eye squad at the 3 stealth suits - seems almost a bit wasteful with the Ghostkeel and Riptide still around, or the Crisis Suits.
ReplyDeleteThis batrep has motivated me a little - I'm in a bit of a lull right now when it comes to my Scars. No idea why really.
Thanks for sharing!
Glad you enjoyed it Chris. The special rules didn't really apply too much in this game as I did not target the Tau Commander and lost a lot of my bikes, so wasn't getting the double hammer of wrath hits much.
DeleteI was unaware that if you moved with Salvo weapons, you only get to fire at half range. As a result, when the Devastators disembarked from the Razorback, they were not in range of anything to fire. I decided to run them in the hope they would survive till the following turn and get a chance to fire at something.
I went after the three stealth suits to clear them off the objective and score Supremacy in the first turn. I figured that I would go for the maelstrom points rather than just try to kill something else that turn. I don't think I would have been in range of the Ghostkeel or Riptide with them on turn 1, due to Nick's deployment and assault moves.
Thanks for the clarifications! Definitely agree on the stealth suit kill now, and the rest makes sense to me now, too. Yeah th salvo rule isn't too familiar to us bike spammers (relentless) :D
DeleteIt doesn't trigger very often Chris, cos so few players ever use grav without it being on bikes or centurions, but we had a guy at our club a while back who really didn't understand the salvo rule so we've had to go over it quite a few times with him!
DeleteGreat battle report, a joy to read, and the diagrams along with the pics really help to see what going on and where on the battlefield.
ReplyDeleteI put two piranhas in my Tau force, and I used to get them killed to early, but it was interesting to see them zipping around grabbing objectives late game. I'll probably try to be a bit more conservative with them in the early game. I can sacrifice 4 shots early to have fast skimmer later in the game to get objectives.
There didn't appear to be much Coordinated Firepowwer being used ? Was that due to the MSU nature of your force ? I would of thought some of the smaller lighter units would be combining the firepower more, particularly at such targets as Khan's bike squad.
Rathstar
Cheers Rathstar, glad you enjoyed it!
DeleteNot sure why the co-ordinated firepower didn't come into effect more for Nick. Maybe he forgot to use it or didn't feel it was useful in a lot of the situations.
Hi Rathstar,
DeleteI can't remember exactly why I didn't use it more, certainly on the earlier turns it wasn't necessary as the tanks went down quite quickly. I have a habit of assessing what dice should be required to achieve something though and I hate wasting firepower so if the odds don't suggest I need to combine, then I don't bother. Of course that's fine until the dice betray you and don't roll average (one way or the other mine never do so you'd think I'd have learned)!
This comment has been removed by a blog administrator.
ReplyDelete